Main window
The Orc-GUI main window contains:
- A menu bar (File / View / Tools / Help)
- A toolbar with quick-access buttons for common actions
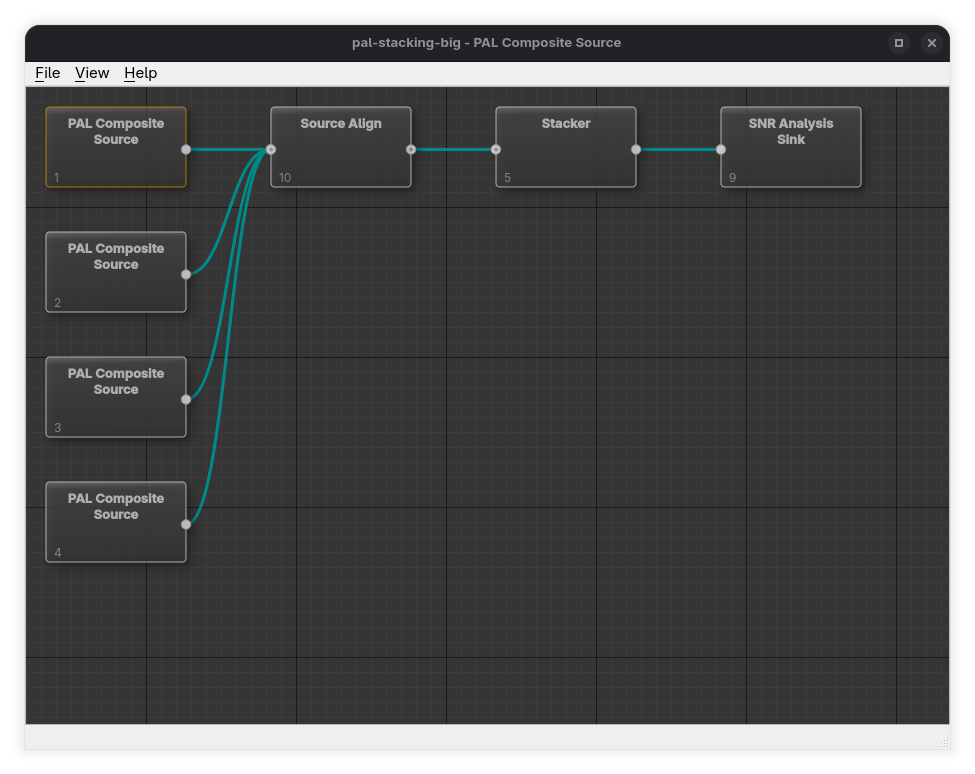
- A central processing graph editor where you build your pipeline using stages and connections
- A status bar that shows short messages about what the application is doing
Toolbar
Directly beneath the menu bar is a toolbar with buttons for the most common actions. Each button mirrors a menu item, so the menus remain available as well.
| Button | Does the same as | Notes |
|---|---|---|
| Arrange to grid | View → Arrange DAG to Grid | Tidies the graph into a left-to-right grid. |
| Show preview | View → Show Preview | Opens the Preview window, or brings it to the front if it is already open. Disabled until a project is loaded. |
| Reload all sources | File → Reload All Sources | Re-reads every source in the project from disk. Disabled until the project contains a source stage. |
| Theme | Tools → Themes | A single button that cycles the theme in the order Auto → Light → Dark. Its icon shows the current mode — a half-disc for Auto, a sun for Light, and a crescent moon for Dark — and stays in sync with the Tools → Themes submenu. |
You can hide or show the toolbar with View → Show Toolbar.
Menu Bar
File Menu
New Project…
Creates a new, empty project.
When you choose File → New Project…, Orc-GUI asks you to select a project type:
- NTSC Composite
- NTSC YC
- PAL Composite
- PAL YC
- PAL-M Composite
- PAL-M YC
You can also choose the project's amplitude display unit (IRE, millivolts, or 10-bit samples; the default is 10-bit samples), which is used by dialogs such as the Line Scope.
A new project starts with an empty graph (no stages are added automatically). You add stages yourself in the graph editor.
Quick Project…
Creates a ready-to-run starter project from an existing capture.
When you choose File → Quick Project…, Orc-GUI asks you to select a video file:
.tbc(composite TBC).tbcc/.tbcy(YC TBC; requires both files as a pair).cvbs(composite CVBS).cvbsy/.cvbsc(YC CVBS; requires both files as a pair)
Orc-GUI then looks for the associated metadata alongside the file:
<base>.tbc.dbfor TBC captures (legacy<base>.tbc.jsonmetadata is accepted with a warning)<base>.metafor CVBS captures
If the metadata file is missing, the quick project cannot be created.
What Quick Project sets up for you:
- Detects whether the capture is PAL, NTSC, or PAL-M from the metadata
- Adds the appropriate source stage for the detected system and input type
-
Reads the decoder recorded in the metadata and builds the pipeline to match:
-
ld-decode sources get a Dropout Correction stage between the source and the Video Sink (
source → dropout correction → video sink). When the source has an EFM sidecar, an EFM Decoder Sink is also added and fed from the Dropout Correction stage's output. - All other sources (for example vhs-decode) are connected straight from the source stage to the Video Sink stage. Captures with only legacy JSON (
.tbc.json) metadata carry no reliable decoder identity and are always treated as non-ld-decode. - Adds a Video Sink stage (FFmpeg output mode by default)
-
If found, automatically attaches optional files next to the capture:
-
<base>.pcm <base>.efm
After creating a quick project, you should usually:
- Open Stage Parameters on the Video Sink stage to set the output path and mode, or use its FFmpeg Preset Config stage tool to apply an export preset
- Use File → Save Project As… to save the new project (quick projects start “unsaved”)
Open Project…
Opens an existing .orcprj project file.
Save Project
Saves the current project.
If the project has never been saved before, Orc-GUI will prompt you to use Save Project As….
Save Project As…
Saves the current project under a new filename.
Edit Project…
Edits project-level details (such as name/description). This is enabled only when a project is loaded.
Reload All Sources
Re-reads every source stage in the project from disk (Ctrl+R).
Use this when the capture behind the project has changed since you opened it — for example when it is still being written by a decoder, or when you have re-run a decode over the same file. Reloading rebuilds the pipeline from the project, so every source stage reopens its media and re-reads its metadata, and the preview picks up the new frame count.
Nothing in the project is changed: the graph, the stage parameters and the modified flag are all left as they are. This is the same refresh a stage parameter dialogue's Update button performs, applied to every source at once instead of one at a time.
The action works while any non-modal Orc-GUI window has focus, including the Preview window, and is greyed out until the project contains at least one source stage. It is also available as the circular-arrow button on the toolbar.
Because the rebuild replaces every stage object, open analysis and catalogue result windows are closed and preview playback is stopped — trigger the stage again to refill them.
Quit
Exits the application.
View Menu
Show Preview
Opens the Preview window (if a project is loaded), or brings it to the front if it is already open. This is where you can view decoded output for the currently selected stage.
Show Preview on Selection
A toggle.
When enabled, Orc-GUI automatically shows the Preview window when you select a stage in the graph editor.
Arrange DAG to Grid
Automatically lays out the graph in a tidy left-to-right grid based on stage order.
Use this when your graph becomes messy after adding or moving stages.
Show Toolbar
A toggle that hides or shows the toolbar beneath the menu bar.
Tools Menu
Plugin Manager…
Opens the Plugin Manager, which lists your installed plugins — the registered stage plugins — and lets you add, browse for, remove, update, enable, and disable them. orc-cli plugins does the same things from a script, on the same registry file; each action below names its command-line equivalent.
The table has one row per plugin, with columns ID, Path, Version, Update, Source and Enabled. The registry file being edited is shown above the table.
- Add Plugin… registers a new plugin, either from a local plugin file or from a GitHub releases URL. Remote plugins are downloaded automatically. Adding a plugin is your consent for it to run: plugin binaries execute as native code, so only add plugins from sources you trust. CLI:
orc-cli plugins add <path>ororc-cli plugins add --url <releases-url>. - Browse Plugins… opens the Browse Plugins dialog, which lists the available plugins in the curated index and installs one for you. CLI:
orc-cli plugins searchandorc-cli plugins install <id>. - Remove deletes the selected plugin from the registry (core plugins cannot be removed). CLI:
orc-cli plugins remove <selector>, ororc-cli plugins remove --dry-run <selector>to see which entry would go without writing anything. - Update re-fetches the selected plugin from its latest published release. It is enabled only for a row whose Update column reports one. A new binary is a new consent, so the update asks you to confirm trust again before it is downloaded. CLI:
orc-cli plugins update <selector>, ororc-cli plugins update --all. - The Enabled checkbox shows whether a plugin will load at the next application start. Entries that arrived from outside Orc-GUI (a hand-edited registry file,
orc-cli plugins install, or a newly downloaded update you have not confirmed) appear unchecked; ticking the box asks you to confirm that the plugin may run, then enables it. CLI:orc-cli plugins enable <selector>andorc-cli plugins disable <selector>. - Show core plugins is unticked by default, so the list shows only the plugins you installed yourself. Tick it to also see the plugins that ship with the application — the core plugins. CLI:
orc-cli plugins list, andorc-cli plugins list --coreto include them.
The Update column is filled in by a check that runs in the background when the dialog opens; until it finishes, entries read Checking.... An entry then reads Up to date, Update available (version), Unreachable when the release could not be fetched, or — for a plugin with no upstream repository to check. CLI: orc-cli plugins updates, or orc-cli plugins list --check-updates.
Details
The Details pane beside the table describes the selected plugin: its selector, its id when that differs, the installed version, the latest published version and update status once the background check has answered, license, source, path, whether the binary exists and is loaded, the ABI it needs against the ABI this build provides, and its status. A field with nothing to report is left out. The same fields, in the same order and with the same labels, are what orc-cli plugins info <selector> prints.
A selector is how both front ends name one entry: the plugin's id when it has one, and otherwise a path: or url: handle. Whatever the pane shows, the command line accepts unchanged.
Status is the single answer to "will this load?". It reads Enabled when the plugin will load at the next launch, and otherwise names the one reason it will not:
- Disabled — will not load until it is enabled.
- Not trusted yet — will not load until you confirm that it may run.
- Needs a rebuild — the plugin was built for a different Orc ABI; its Version cell is marked ⚠.
- Binary missing — the plugin file is not present at its recorded path.
- Core plugin — ships with Decode-Orc and always loads.
Diagnostics
The collapsible Diagnostics section at the bottom lists what the plugin runtime recorded while loading plugins at startup, each line prefixed Info, Warning or Error. These are the same messages orc-cli process and orc-cli filter print for a run; CLI: orc-cli plugins doctor, which also reports the plugin search paths.
Registry changes take effect on the next application launch; when you close the dialog after making changes it offers to quit Decode-Orc so you can start it again.
Browse Plugins
Reached from the Plugin Manager's Browse Plugins… button. It lists the available plugins — the curated index of third-party plugins Decode-Orc knows about — and installs one into your registry. CLI: orc-cli plugins search.
- The dialog opens on the full list; the search box narrows it by id, name, description or tag. CLI:
orc-cli plugins search <term>. - A banner above the list reports how the listing was sourced: how many plugins are available, or offline — showing the last cached index when the index could not be fetched and a previous copy was used.
- Entries are annotated installed when a copy is already in your registry, incompatible when the latest release publishes no build for this host, and unreachable when its release information could not be fetched.
- Selecting an entry shows its details — id, name, description, latest version, license, maintainer, source repository, tags, whether it is compatible with this host, and whether it is installed. For a plugin you already have, the installed field also says which version you have and whether a newer release is published. CLI:
orc-cli plugins info <id>. - Install… downloads the selected plugin's latest release and registers it. It is enabled only for a compatible entry you do not already have. Installing is your consent for it to run, so it asks you to confirm trust first. CLI:
orc-cli plugins install <id>.
The id the details pane shows is exactly what orc-cli plugins info and orc-cli plugins install accept, and once the plugin is installed it is also its registry selector.
Logging…
Records what the application is doing to a file. Turn it on before reproducing a
problem, then attach the file to your bug report — see
Reporting issues. CLI: orc-cli --log-level,
--log-file and --log-out.
- Write log messages to a file turns file logging on and off. Anything the application prints to the console when it is started from a terminal keeps going there either way.
- Detail chooses how much is recorded, from
trace(everything, including per-frame detail) down throughdebug,info,warn,errorandcriticaltooff. debug is the level to send with a bug report;infois the default. A line beneath the box says what the selected level records. - Log file is where the file goes. Leave it blank to use the location shown greyed out in the field — a
decode-orc-logsfolder in your documents directory, beside where crash bundles are written. Browse… picks a different one; the folder is created if it does not exist. - Open Log Folder opens the folder holding the log file in your file manager, ready for you to attach it to a report.
The summary line at the bottom of the dialog says what will be captured and where. Clicking OK applies the change straight away: there is no need to restart, and stage plugins that are already loaded start writing to the new file too.
The log file is replaced rather than appended to, so it only ever holds one capture and can never mix two sessions together. It starts again from empty every time the application is run, and whenever you turn logging on or point it at a different file. Raising or lowering Detail part-way through a capture keeps what has already been recorded.
A detailed log grows quickly, so turn logging off again once you have captured the problem.
Release builds have trace records compiled out of them, so on a released
version trace records no more than debug does. The dialog says so when that
applies to the build you are running.
Your choice is remembered for the next run. The --log-level, --log-file and
--log-out command-line options configure a single run instead and leave the
remembered settings alone; when any of them is given, the dialog opens showing
what that run is using.
Themes
Chooses the user-interface theme, applied immediately:
- Auto follows the operating system's light/dark setting and tracks changes to it while the application is running.
- Dark and Light force the respective theme regardless of the OS setting.
The choice overrides the --theme command-line option and is remembered between runs. The same modes can be cycled quickly from the theme button on the toolbar.
On Windows, controls are normally drawn by the operating system's own widget style. That style cannot draw dark controls on Windows 10, and on Windows 11 it can only draw the scheme the desktop itself is set to, so the application switches to Qt's Fusion style whenever the selected theme cannot be rendered natively. Buttons, drop-down lists and text fields then look slightly different from other Windows applications, but stay readable.
Help Menu
User Guide…
Opens this user guide.
About Orc GUI…
Shows version/about information.
Graph Editor Basics
The graph editor is the central workspace where you build your processing pipeline using:
- Stages (boxes)
- Connections (lines between stage ports)
Adding Stages
To add a stage:
- Right-click on empty space in the graph editor
-
Pick a stage from one of the categories:
-
Source
- Transform
- Analysis
- Sink
- Plugins (stages from externally installed plugins, grouped into the same four categories)
Only categories that contain at least one stage are shown.
Orc-GUI filters the available stages to match your project’s video system (PAL/NTSC/PAL-M). For source stages it also filters by input type (Composite vs YC).
The new stage is placed where you clicked.
CLI: orc-cli stages list lists the same stages in the same categories, and orc-cli stages list --format PAL applies the same video-system filter. The menu shows each stage's display name; the CLI also reports the internal stage name, which is what --source, --filters and --sink accept.
Creating Connections
To connect stages:
- Drag from an output port on one stage to a compatible input port on another stage
Connections represent the flow of data through your pipeline.
Selecting Stages and Connections
- Click a stage to select it
- Click a connection line to select the connection
To select multiple items, use standard multi-select gestures (depending on platform):
- Hold Shift or Ctrl/Cmd while clicking additional stages
- Drag a selection rectangle on empty space to select a group
Moving Stages
- Click and drag a stage to reposition it
- With multiple stages selected, dragging one typically moves the selection together
If the layout becomes hard to read, use View → Arrange DAG to Grid.
Renaming a Stage
- Right-click a stage
- Choose Rename Stage…
This changes the label shown on the stage.
Editing Stage Parameters
- Right-click a stage
- Choose Edit Parameters…
Use this to set file paths, decoding options, thresholds, output settings, and other stage-specific behaviour.
CLI: orc-cli stages info <stage> describes the same parameters — display name, description, type, whether it is required, default, range, allowed values and dependencies. orc-cli stages info <stage> --yaml emits a parameter block to paste into a project file, and --filtergraph emits the form --source/--filters/--sink take.
Running Stage Tools
Some stages offer interactive tools such as analysis, visualisation, and configuration helpers (e.g. the Disc Mapper, Dropout Editor, or FFmpeg Preset Config).
To access them:
- Right-click a stage
- Open Stage Tools
- Choose an available tool
If no tools apply to the selected stage, the menu will show that none are available.
Triggering a Stage
Sink stages are executed by triggering them.
- Right-click a stage
- Choose Trigger Stage (if enabled)
If an action is unavailable, it is disabled and may show a tooltip explaining why.
Stage Help
Every stage documents itself.
- Right-click a stage
- Choose Help…
This opens the stage's built-in documentation (purpose, parameters, tools, and status-indicator meanings).
CLI: orc-cli stages help <stage> prints the same document.
Zooming and View Navigation
Zoom In/Out
- Use the mouse wheel over the graph editor to zoom
Zoom is intentionally limited (approximately 70% to 100%) to keep stage rendering readable.
Panning
Panning behaviour depends on platform and the underlying graph widget.
Common gestures include:
- Dragging the background with the middle mouse button
- Trackpad pan gestures
Deleting Stages and Connections
Deleting Connections
To delete a connection:
- Select the connection line
- Press Delete
Deleting Stages
To delete a stage:
- Select the stage
- Press Delete
Important behaviour:
- Orc-GUI blocks deletion of stages that still have connections
- If you try, you will be prompted to disconnect all connections first
Alternative:
- Right-click a stage and choose Delete Stage (only enabled when the stage can be removed)